Friday, November 30, 2012

It's Christmas Ornament time! JustRite Style!

It's that time of year, decking the halls with boughs of holly and putting those ornaments on the tree!  Last year I made an ornament from a wedding invitation, an idea that I saw on Pinterest!  Ahhh, Pinterest!  What did we do without Pinterest? Cutting up a wedding invite is painful! But look at the results!

  
Decking out the ornament with JustRite's new Vintage Pearls Set was a must!  This cling set features 11 stamps and are perfect for a wedding/love theme!

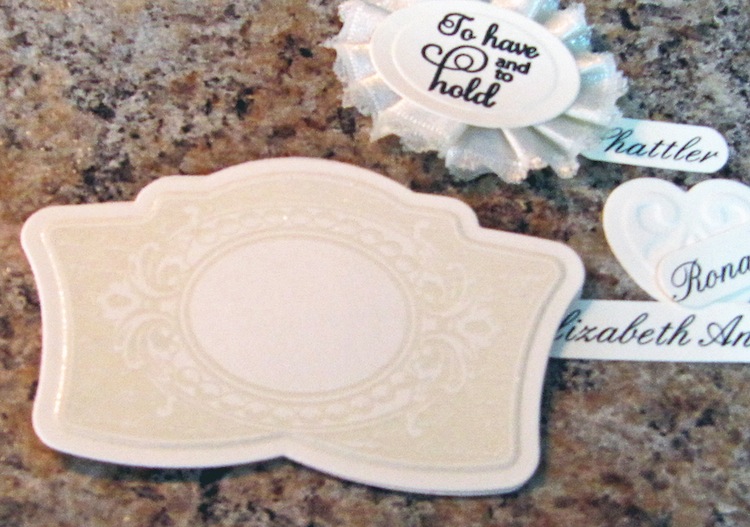
I stamped the smaller label with VersaMark Ink, then heat embossed with clear embossing powder. It is a beautiful design and looks so elegant!  I cut the image using JustRite Coordinating Spellbinder Vintage Label & Banner Dies.

It does not get much better than having coordinating dies for your stamped images!  Love, Love, LOVE these dies!  The little heart is wonderful, no?  Find these Spellbinder Dies HERE.


Here is a peek at the back of the ornament.  I used the heart die cut from the coordinating die set along with the couples name from their invite!  What was neat about this particular invitation is it had a printed velum overlay that I could cut up along with the invite words to place inside the glass bulb!

Here is a look at the front, removed from the tree.  The sheer ribbon and lace are found at The Stamp Simply Ribbon Store along with the satin ribbon on the label! The label sentiment from Vintage Pearl Labels is stamped with VersaFine Onyx Black ink which is also found at The Stamp Simply Ribbon Store!  


Thanks for stopping in today!  Tomorrow I will have another one of these wedding invitation ornaments to share!  They are so easy, fun, and create such a special keepsake! It's been a wonderful week previewing JustRite's December releases! 

Here are the talented JustRite Designers bringing you inspiration galore today!

Wednesday, November 28, 2012

Solo Cups! Because I Care, I will give Chocolate Treats! JustRite Style!

Welcome to JustRite's Day Two of their December Release!  I am chiming in today with two solo cup treat containers!  But before we get to those details, be sure to check HERE for all of JustRite's Day One Release Information and Inspiration! 

Hugs & Kisses Sentiments is a JustRite Clear Set featuring 26 stamps!  Lots of options here, gotta love that many stamps in a set!  Mix them up, make more than one item at a time! On a side note, I've recently been asked, why do I make two of most creations I post?  Well, the answer is, I have two daughters!  I very seldom keep anything I make, I love to give it away!

I started with white pointed disposable paper solo cups, you know the kind that are placed in plastic coffee cups at the office?  Using Memento inks, I sponged and rubbed ink on the outer cup until I reached the desired shade.  It dried rather quickly, the paper is a bit absorbent but nothing that breaks the sturdiness of the cup.  Next, I brushed a thin layer of water diluted glue over the entire outside cup before rolling in clear Martha Stewart glitter! Yes, this was FUN!

Basic stamping and trimming out the pieces is all it took to finish the embellished cups.  This green cup sports Webster Page's Bloomers from their GirlLand Kit.  The Tiny Twinkle Gems on the stamped borders add a bit of bling to balance out the glitter!  Burlap string holds the tags in place on each cup hanger.  The pink cup's Melissa Frances ruffled trim, with pompom trim atop it, and an added gingham ruffle embellish the cup rather nicely, no?   There you have it, two solo cups ready to be filled with chocolate, of course!  Let's have a party!  See you tommorow for Day Three!  

Be sure and stop these talented JustRite  designer's BLOGS to see inspiration galore!  ENJOY!  


STAMPS: Hugs & Kisses Sentiments (JUSTRITE)
INK: Memento Pear Tart & Angel Pink, Tim Holtz Distress Old Paper(STAMP SIMPLY RIBBON STORE), VersaFine Sepia(STAMP SIMPLY RIBBON STORE)
PAPER: Solo cups(GORDON FOOD SERVICE), White Cardstock(PAPERTREY INK)
OTHER: Aleene's Tacky Glue & Martha Stewart Glitter(MICHAELS), Webster's Pages GirlLand Bloomers(STAMP SIMPLY RIBBON STORE), PomPom Trim(STAMP SIMPLY RIBBON STORE), Gingham Ruffle(STAMP SIMPLY RIBBON STORE), Melissa Frances Ruffle Trim(STAMP SIMPLY RIBBON STORE), Burlap String(STAMP SIMPLY RIBBON STORE), Tiny Twinkle Gems(TAYLORED EXPRESSIONS) 

Tuesday, November 27, 2012

Using Graphic45 Little Darlings for our Little Darling, Averie Jeanne!

Remember this Little Darling?  Our beautiful granddaughter, Averie Jeanne is getting baptized this Sunday and Grandma had to make her a little something to celebrate the occasion! Certainly made with love and thankfulness for this little blessing! 
Truth be told, I started with the hopes of getting a card made for the occasion!  I went to my Graphic45's paper pad, Little Darlings along with the coordinating chipboard tags from The Stamp Simply Ribbon Store.  After punching out tags, trying to figure out what I was going to do...

I was seeing this.  The negative punched tag board, a frame I had on my desk forever, and this wonderful Little Darlings paper pad along with leftover bits and pieces from these Little Darling cards I made HERE.  

Could it be?  Could I make these chipboard tags and what they were punched from work into this shadow box frame?  I knew it would have to be cut to frame size.  Ok, but not all tag spaces would be fully usable after cutting.  Hmmm, so why not use the paper to frame over those spaces?  Yes, it is really going to work! I started to build.  

I left three tags intact, taping them on the back to be sure they could not be punched out any longer! I selected another piece of paper to show through the tag frames I was leaving vacant.  I taped that to the backside top and sides, leaving the bottom open so pictures could be inserted into those spots!  Four more tags would be raised a bit atop the base piece.  Silk ribbon, Prima Whisper Reflections Flowers, with Prima Wave Trim across the top and down the side completes the look!  So easy, simple and what fun!  Can't ask for more than that!  

The shadow box frame came from Michaels.  I do not recall how much it cost, but pretty sure I used their coupon when I bought it!  The backing that is inserted in the frame box has a nice material covering.  You use Velcro (which was included) to attach what you want onto the material. From this picture, you can see the locations where I attached Velcro. They are strategically placed where solid chipboard was located, enabling me to press firmly, attaching the finished unit securely.  
And what about that card?  Using more of the wonderfully pretty papers, this is what I came up with.  No stamping, no die cutting, fast, easy, and fun!  You can get a ton of paper crafting mileage from these Little Darlings Graphic45 coordinating products! On a side note, these papers include blues and greens, so they are just as much for baby boys too!  


Graphic45 Little Darlings Paper Pad is HERE
Graphic45 Little Darlings Tags are found HERE
HERE is where silk ribbon is located
Prima Whisper Reflections Flowers are HERE
Adhesive Pearls, Bliss are HERE
Burlap String can be found HERE
Prima Wave Trim is HERE

Wednesday, November 21, 2012

Day Two, Becca Feeken's December Kit #4 with JustRite Designers!

How about an ornament or package tie ons?  I used Becca's December Kit to make just that today!  All in info on how you can get Becca's December kit is HERE!  

After stamping the rose image, I applied my good ole' reliable chalks! I then trimmed them out and added a silk ribbon bow and pearl before attaching to the ornament.

Here is a pic of both of them!  The ribbon, adhesive pearls, leaf trim, and foam dimensionals are found at The Stamp Simply Ribbon Store!


LOVE the intricate design with these December Kit dies.  They are wonderful to work with!  There you have it!  A simple, yet lovely ornament for today!  I pray you and your family have a wonderful Thanksgiving!  Take good care!

Here are the designers participating today with inspiration goodness using Becca's stamps and dies!


Tuesday, November 20, 2012

Bless Your Heart! It's Amazing Paper Grace reveal time with JustRite Designers!

Hello Tuesday!  JustRite Designers are revealing their latest creations using Becca Feeken's December's KIT!  I created these table style favors.  They will each hold candy and serve as a Thank You favor placed at each table setting!  I've been playing around with this purple and grey color duo as these are the colors our youngest daughter has chosen for her upcoming wedding! More on that later! 

The Filigree Bracket Label Dies Set is amazing!  Like in amazing Paper Grace!  This Spellbinders set features three dies!  Wait till you see what Becca and the rest of the JustRite Designers have created using these!  Can I just say WONDERFUL!

OK, let me walk you through how I made today's creation!  I cut my Recollections purple paper with the largest die, then scored twice creating a base for the favor.  The mid point (point) of the die cut is placed at 3/8" on each side of the point and scored. This creates a perfect base for a piece of candy!

Here is the stamp set in its entirety.  Becca's December KIT info can been seen HERE.  All the links on how to purchase the kit and all Becca's creations using the December are found HERE as well.   

I stamped the two rose images with VersaMark watermark ink.  You can see in the photo I used scrap paper to prevent any stamping other than where I wanted it to be.  

This shows the glue placement of the smaller die cut before adhering it to the inside of the favor die cut. I did not want the small filigree die cut to be completely glued.  In the next pic I will share why! The metallic string embellished straight pearl head pins function is to hold the favor closed. They are found HERE.  They are nice, long and so pretty!

I glued another small filigree to the outside of the favor front, placing it above the edge to allow the straight pin to pass through and catch the inner filigree.  This simple concept holds the favor closed!  Easy to remove, and no need for any other type of fastener. Simple, but makes a design statement!
And here is a single favor view!  Tomorrow I will be back with a couple ornaments using Becca's Amazing Paper Grace December Kit!  See you then!


Here are the designers participating today!  Click on the  names to arrive at each respective blog. You'll be so glad you did!  Unlimited inspiration for you to enjoy!

Sheri Holt
Marisa Job
Michele Kovack 
Eva Dobilas
Barb Schram

Kathy Jones


STAMPS: JustRite What Defines Us (Becca's Kit)
INK: VersaMark Watermark (Stamp Simply Ribbon Store), Onyx Black VersaFine (Stamp Simply Ribbon Store), Memento 
PAPER: Recollections Purple (Michaels), Bazill Grey (Michaels)
DIES: JustRite Custom Spellbinders Filigree Bracket Labels Dies (Becca's Kit)
OTHER: Adhesive Gems (Stamp Simply Ribbon Store),  Metallic Silver String (Stamp Simply Ribbon Store), Pearl Head Straight Pins (Stamp Simply Ribbon Store), Adhesive Pearls (Stamp Simply Ribbon Store)

Monday, November 19, 2012

Away in a Manger in Grey! Stamp Simply Ribbon Store card!

Good Monday Morning!  Can you believe this is Thanksgiving week?  I know, I can't believe it either! I have a 4 1/4" x 5 1/2" card to share with you today featuring products from The Stamp Simply Ribbon Store!  A while back I shared a couple Tina Wenke Stampavie Away in a Manger Cards HERE.  I made several for all our grandchildren this year, but this one is my favorite.  A study in Copic greys! LOVE the pink floppy blossom ribbon embellishment from Melissa Frances. I trimmed off two of the flowers from the strand, tied them with grey/white bakers string before stringing through a punched 3/4" circle.  This stabilizes and gives the flower a base which enables me to better adhere it to the card! 

Cool Greys, Warm Greys, Toner Greys make for a wonderful coloring of this image, no? The image is stamped with Memento Tuxedo Black ink.  I then cut the image using Spellbinders Decorative Labels Eight.  The pink panel and grey card  base are cut using Spellbinders A2 Matting Basics A.  It is raised using 3D square foam dimensionals, double stacked for height!  

A peek at the card inside!  Using Memento Black ink, I stamped a JustRite Large Fancy Holiday Sentiment and cut it out using a Spellbinders A2 Fancy Weave Die.  Go take a look at The Stamp Simply Ribbon Store and pick a Stampavie image to get your cards started for the holidays!  There are so many great ones to choose from!  Praying you will have a wonderful Monday!  Take good care! 
HERE is the Stampavie image I used on today's card, Away in a Manger. Below I am sharing a couple more of my favorites!
Baby Jesus with Animals is another one of my favorites!  Isn't is precious?  
This Cardinal on Pine Branch would look spectacular for a holiday card. Or simply a winter card!  I cardinal winter cards in my future!  Hope you enjoy viewing a few of my favorite Stampavie images for the holidays this year!


  • All STAMPAVIE images are found HERE
  • Away in a Manger is HERE
  • Memento Tuxedo Ink is located HERE
  • Melissa Frances Pink Floppy Blossom Ribbon Embellishment is HERE
  • Bakers String located HERE
  • Spellbinders Decorative Labels Eight are HERE
  • Spellbinders A2 Matting Basics A are HERE
  • Spellbinders A2 Fancy Weave Dies are found HERE
  • JustRite Large Fancy Holiday Sentiments are HERE
  • Adhesive Foam Square Dimensionals are located HERE

Thursday, November 15, 2012

A Happy Birthday Banner in JustRite Genuine Fashion!

Good Morning!  This is the final day of JustRite's November Release!  I am in LOVE with the background stamps featured this month and today I made a banner with the new JustRite Cling Genuine Friend Background Stamp!

Here is a look at the Genuine Friend Background Stamp!  I stamped this image three times using Memento Rich Cocoa Ink, after trimming stamped image, I shaded edges with Tim Holtz Scattered Straw distress ink.

A closeup look at the middle flag.  I added a Happy birthday sentiment here to highlight the whole purpose of the banner, obviously to have hanging decor in celebration of special birthdays! Don't you just love the way some of the words in the image are bolded?  It adds that bit of interest to the entire stamp, no?

Such a fun set!  Premium Labels is a clear set featuring 19 stamps.  I stamped the circular star image with Memento Lady Bug Red, and the center Happy Birthday sentiment with Tim Holtz Faded Jeans Blue on Kraft cardstock.  Circle punches were used to cut the circular layers before adhering to banner panels. 

This picture gives you a better look to see how the top panel layer does not lay flat upon the red cardstock.  It is hard to photo, but in real life adds great dimension to the banner.  Divine Twine Baker's String is added to the panel tops and the two outer panel bottom edges.  Again, adding that detail for interest!  Now I have a more masculine banner to hang for the men celebrating birthdays in my life!    


Here are today's designers who are sharing awesome creations using the November Release Sets!  Click on each name to arrive at their respective blogs!

STAMPS: Genuine Friend Background (JustRite), Premium Labels (JustRite)
INK: Memento Rich Cocoa & Lady Bug Red, Tim Holtz Faded Jeans & Scattered Straw (Stamp Simply Ribbon Store)
PAPER: Cardstock (PapertreyInk)
OTHER: Divine Twine String (Stamp Simply Ribbon Store), Red Gingham Ribbon (Stamp Simply Ribbon Store), Square Foam dimensionals (Stamp Simply Ribbon Store), Misc buttons & string 

Tuesday, November 13, 2012

Wings of Love! Happy Birthday Card, JustRite Style!

Welcome to Day One of JustRite's NOVEMBER Release Party!  JustRite Designers have been busy creating special creations to share with you!  Today I made a standard, 4 1/2" x 5 1/2" card.  

My card features the new background stamp, Wings of Love.  I chose to keep the image subtle by stamping with Memento London Fog ink.  After cutting the stamped image using my Decorative Grand Oval die, I shaded it with Tim Holtz Distress ink.  I then added some Copic pink coloring to pop out the post card image in the stamp design.  Wanting this for a birthday greeting, I added a Happy Birthday Sentiment from a new set debuting tomorrow!  The awesome embellishments are from The Stamp Simply Ribbon Store and are all linked below along with the other card products.

Come back tomorrow for Day Two, I will have a bit of decor to share!  Have a great Tuesday, hope it's a terrific one for you!

Be sure to take in all the inspiration the following JustRite Designers have for you. Clicking on each name will take you to each respective blog!  Enjoy!
JustRite Inspiration


STAMPS: Wings of Love Background Stamp (JustRite)
INK: Memento London Fog & Angel Pink, Tim Holtz Old Paper Distress (Stamp Simply Ribbon Store)
PAPER: The Sweetest Thing/Honey by My Minds Eye (Stamp Simply Ribbon Store), PapertreyInk Cardstock
DIES: A2 Matting Basics B Card Creator (Spellbinders), Grand Decorative Ovals One (Spellbinders)
OTHER: 1 1/2" Pink Silk Ribbon (Stamp Simply Ribbon Store), Green Satin Leaf Trim (Stamp Simply Ribbon Store), Prima Interlude B Pink Flowers (Stamp Simply Ribbon Store), Pink Burlap String (Stamp Simply Ribbon Store), Misc Button, Copic Markers

Sunday, November 11, 2012

Orange Slice Candy transformed to Thanksgiving Pumpkins! Stamp Simply Style!


I AM LINKED TO THE ABOVE  PARTIES!


Good Sunday Morning!  How about using orange slice candy for Thanksgiving Pumpkins?  Isn't this the cutest ever?  I was searching for Pumpkin Ideas a while back and came across a You Tube video with a gal sharing how this is done! I thought I can do this!  Yes, I can!  And add some Stamp Simply Ribbon Store love to make it even cuter!  

Here is what you need for these adorable, easy, and fun pumpkins!  

  • Orange Candy Slices
  • Clear Cling type wrap
  • Green stretch floral tape
  • Small bowl/container to hold wrap & slices
  • Lay a piece of cling wrap in bowl.  For this pumpkin, I used 7 slices.  It really depends on the size of your slices and how big you want your pumpkin to be, it's up to you! 
After carefully pulling up each corner and sides of wrap, start twisting the cling wrap, the tighter the better. Have your floral tape ready to adhere and wrap a few times around twisted wrap, creating a stem. 

Here is a picture showing one with the excess wrap cut off and one before.  This makes the coolest stem.  Perfect to add some Stamp Simply Store embellishments, no?

Here is a picture of all three I made this time around!  JustRite's Autumn Words Stamp Set is a perfect stamping choice!  I created my tag sentiment by choosing two stamps, Pumpkin and Treats. This set features 40 stamps and is also on sale the SSRS!  It is perfect for Thanksgiving and beyond! I stamped using Versafine Vintage Sepia Ink onto my white card stock before hand trimming and shading tag edges.  After cutting the satin leaf trim, I tied it around each stem.  I then attached each tag using brown & white Divine Twine string.  The final touch is Prima Velvet Rainbow Natural Leaves!  Voila' and look what we have! Adding that trim and stamped tags make these pumpkins perfect!

  • JustRite Clear Autumn Words are HERE
  • VersaFine Vintage Sepia Ink is located HERE
  • Prima Velvet Rainbow Natural Leaves are HERE
  • Satin Leaf Trim is found HERE
  • Divine Brown/White Twine String is HERE