Wednesday, May 25, 2011

Let's Celebrate! Just Because!

Are you ready for some inspiration today? JustRite Designers are joining the Stamper's Dream Store Designers for a BLOG HOP! There is great blog candy to be won too! While you are visiting each blog be sure to leave a little love for all their inspiring work. Along the way we have 3 Mystery Blog Candies hidden somewhere among the blogs. For your chance to win one of the fabulous prizes you must leave a comment on the mystery location blog post. All 21 Locations are eligible locations for the Mystery Blog Candy!! Check the prizes HERE! I created a fun card with a play on the Pennant Spellbinders Dies and a Just Because Mini Sentiment for today's hop! My sentiment comes from JustRite's Just Because Mini Sentiment Set! It is a set of 18 mini sentiments that coordinate wonderfully with JustRite's Happy Everything Tag Making Kit!
A closeup of the sentiment, Let's Celebrate, fit's so nicely on that banner die included in the Lacey Pennant Set!! And how about that string pompom? I will be back tomorrow to show you how I created that embellishment! There you have it! Hope you enjoy your day and hopping along these designer's awesome inspirations!

JustRite Inspiration

Becca Feeken

Michelle Rodgers

Eva Dobilas

Kazan Clark

Arlene Cuevas

Mona Pendleton

Amy Sheffer

Kellie Fortin

Michele Kovack

Tosha Leyendekker

Kathy Jones

Mariana Grigsby

Barb Schram

Stephanie Kraft

Teresa Kline

Heidi Blankenship

Christina Fischer

Angela Barkhouse

Lea Lawson

Sankari Wegman

STAMPS: JustBecause Mini Sentiments (JustRite Stampers)
INK: StazOn Black, SU Craft White
PAPER: Basic Grey Kioshi & October Afternoon Patterned Paper, SU Green & Lavendar, PTI Stampers Select White
DIES & PUNCHES: Shapeabilities Nested Pennants & Nested Lacey Pennants, Labels Eight & Grand Circles (Spellbinders), Spellbinder Custom Tag Die (JustRite), EKSuccess 1/2" and 1" circle punches
OTHER: Adhesive Pearls, White Twill & Bakers String (Stamp Simply RIBBON Store), Sewing Machine, Wire, Misc button

Tuesday, May 24, 2011

Retirement Table Favors!

1 1/2" by 4" tubular clear bags were used to place the printed M&M's in. YES, I did order printed M&M's much to my hubby's protest! What I really wanted was to have his photo on them, but that is where he did draw the line, So compromise I did!

Simple use of a round and label punch to frame the cut out shield. I also used my Kylon Gold Leafing pen on the shield's edges. It really made a difference to the overall look! The bag was folded over and stapled, then the entire tag was adhered with scortape! Simple and fun! I made 120 of these! Both the gold leafing pen and scor tape are found at The Stamp Simply Ribbon Store!

Tomorrow I have a fun card to share that will be among a hopping group of designer's inspirations! See you then! Have a blessed day!

Monday, May 23, 2011

It's a NEW Beginning!

Hi there! I finally can say I am ready for the next chapter! What chapter? My husband's retirement party was this past weekend and he will work his last day this week! I have waited 32 years for this day! So, that is where I've been, working on details, assembling favors, table decorations, etc. It was a beautiful day, a humbling day, and the start of a new beginning for my hubby and I.

In the weeks leading up to the retirement party, my husband mentioned that he should get his picture taken one last time in his uniform! Of course, I couldn't have agreed more! He left the details up to me with a photographer our daughters used for their children. I worked on a date, planned the kid's outfits, accommodating all schedules, not an easy feat! Only to have my husband inform me on the Saturday prior to Mother's Day, he had turned in his uniform to headquarters and forgot about the appointment. Ugh...I spent the day rearranging schedules, calling our girls, frustrating in the very least. As my family watched me come unglued, fret in panic mode, and on the edge of tears, I succumbed to the fact this picture may not happen! Here's the rest of the story! Some time ago I shared pictures of our first grandchild, he is our only grandson and oh so very special. Above is one of the photos I took. You can see more HERE. And now look at this precious boy! His expressions mirror his Papa quite often! He's always on the go, smart as a whip, and such a joy to watch. Then you can just imagine how I sobbed when I was presented with a box of photos on Mother's Day filled with pictures of my hubby with his grandchildren. Our girls and their Dad pulled the surprise off big time! Everyone was in on it! Boy I think I've let my guard down in older age! The above photo is one of my favorites! What a way to start the next chapter, new beginnings stuffed with love of family filling our retirement days! Maybe a few trips now and again, and maybe, just maybe much more time in the studio!

Take good care my friends, see you tomorrow with a few pics of the favors I made for the party!

Tuesday, May 10, 2011

An All Star #1 Dad, You Are The BEST!

Today's card features JustRite's YOU ARE THE BEST set. My vision was to create an old timer baseball looking shirt to hang my ribbon on! I'm not sure I achieved that goal, as I'm thinking more men's pajama looking? It was a blast to create nonetheless! I saw this idea way back when over at Splitcoast Stampers, HERE is the one I cased. I started with my Sticky Back Canvas by Caudine Hellmuth. I purchased mine at Ellen Hutson's Store. It's the first I've used this product and was pleased at how easy it was! I measured and cut a 4 1/4" x 5 1/2" rectangle as that is the size of the card. I then proceeded to cut away the upper left corner at an angle. Using my Copic Marker chisel end I drew my lines, lightly pressing onto the canvas so I would not create a solid line. I drew freehand lines, but if you wanted you could easily measure, mark, and use a straight edge to draw the lines. You are the Best is a JustRite Cling set featuring 17 stamps that clings to any acrylic block. You Are The Best coordinates with Spellbinders Blossoms Three Dies. I used #2 and #3 on my card today. I also utilized Spellbinders Pennants Dies for the ribbon tails. I chose to add some card inside embellishing! Just simple use of the die cuts, an additional sentiment and left over trim! I like! Here is another angle of the card! The buttons are old SU buttons tied with Cherry & White Divine Twine Baker's string. I got my string from The Stamp Simply RIBBON Store. I also added some shading on the stamped ribbon pieces with my Copic Marker C1 and W1 and gave it a somewhat vintage look with distress ink!
Hope you are having a terrific Tuesday! Thank you for stopping by! I appreciate your visits! Take good care, You are the Best!

Wait till you see what these designers have created with this set! Have fun hopping these blogs! ~~~JustRite Inspiration Blog~~~ Sharon Harnist~~~ Mona Pendleton~~~ Angela Barkhouse~~~ Sankari Wegman~~~ Heidi Blankenship~~~ Barb Schram

STAMPS: You are the Best (JustRite) PAPER: Sticky Canvas (Ellen Hutson), White Cardstock (PapertreyINK), Red & Blue (SU) DIES: Pinking Circles Large #1 & Penant Die (Spellbinders), Spellbinders Blossoms Three (JustRite), EK Success 3/4" & 1" circle punches INK: Memento Paris Dusk (JustRite), VersaMagic Red (Michaels), Tim Holtz Old Paper Distress (Joan's Gardens) OTHER: Copic Markers C1, W1, R27 (JustRite), Buttons (SU), Divine Twine String (Stamp Simply RIBBON Store)

Monday, May 9, 2011

Just Because...

Good Monday Morning to YOU! I hope you had a wonderful weekend! I was blessed and surprised beyond measure! I will share all that in another post this week, because I have lots to show you today! JustRite Stampers is sharing inspiration from two of their newest sets, Just Because and Because I Care and I chose to make a set of tags with Just Because! 
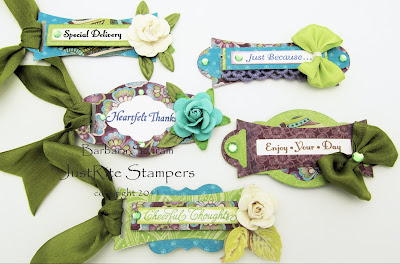
Here is a pic of the entire Just Because Set! 18 mini sentiments that coordinate with our Happy Everything Tag Making Kit! (You do not need the Tag kit to use this new set, because JustRite also offers the mini rectangle clear stamper separately) OMGoodness, how I love to coordinate and interchange my stamps! And take a look at the variety of font usage! Love, love, LOVE this! You might have wondered why is there 5 tags? Because I had this lone wooden box to fill and that is the amount that fit perfectly! This is the last of those wooden boxes I purchased a while back at Michaels. The others are HERE and HERE! Same drill, after adhering the designer paper with scor tape, I sanded and rubbed ink around the edges! A peek at the lid top! I had this purple trim in my leftover stash and added a couple loops to my bow, and made a little flower! After cutting a Gluber in a tiny circle I pressed the trim in a circular fashion, pressing onto the Gluber as I went along, adhesive rhinestone in the center and a perfect embellishment! Info on Glubers HERE! Everything I used aside from purple leftover trim, celery green silk ribbon, and turquoise fairytale rose comes from the above Stamp Simply Utopia Kit! LOVE the colors & the fact Sharon has put all the coordinating elements in one kit, easier for me! For this tag, the largest die comes from the Ribbon Tag Trio Three Shapabilities set. The two rectangles are two of 4 dies included in the JustRite Happy Everything Tag Making Kit. Same dies but adding #2 from Labels Fourteen, inserting it so the top and bottom edges show! For this Tag I utilized two of the dies from the Ribbon Tag Trio Three Set! The top tag fit perfectly into the lower tag slots to create a wonderful look for the papers! I also used a rectangle from the Happy Everything Kit to cut a window in the cover tag, so the sentiment peeks through nicely! And this tag adds a Mega Large Oval Die, #1 to the mix. Just another way to showcase the papers and add dimension to the tag! And the final tag uses Spellbinders Labels Six, Die #1 creating a window to showcase our sentiment. The tiny green leaves come from trim included in the paper kit! I trimmed one and two leaves at a time and glued in place where desired. A peek at the open box with tags inside! I carefully tucked and smoothed the silk ribbon on tag's underside so they did not get all wrinkled and bunched! Behind each tag I placed a strip of 1/2" scor tape for easy attachment to a gift, use as a card embellishment, place on a small gift item, yes indeed, the possibilities are endless! I cut two of each die so I could adhere the die cuts back to back, giving each tag a more finished appearance from the backside! Phew! I told you it would be a long post! JustRite's Just Because Mini Sentiment Set is truly one of those sets I will go to again and again, a welcomed addition to my JustRite collection! Have a marvelous Monday! I have card to share tomorrow, thanks for visiting, You are the Best! (hint of tomorrow's new set)

Take a look at all the inspiration our talented JustRite designers are sharing:

JustRite Inspiration Blog --- Sharon Harnist --- Kellie Fortin --- Michele Kovack --- Mona Pendleton --- Angela Barkhouse --- Kathy Jones --- Debbie Olson --- Heidi Blankenship --- Barb Schram --- Kazan Clark --- Sankari Wegman

STAMPS: Just Because Mini Sentiments (JustRite)

INK: Memento Rich Cocoa & Tuxedo Black, KaiserCraft Amethyst & Splice (Stamp Simply RIBBON Store)

DIES: Spellbinders Ribbon Tag Trio Three & Labels Fouteen (JustRite), Labels Six & Mega Ovals (Spellbinders)

PAPER: KaiserCraft Utopia (Stamp Simply Ribbon Store)

OTHER: Olive Silk Ribbon, French White Failytale roses, leaf trim, adhesive rhinestones, scortape, Glubers (Stamp Simply Ribbon Store), Wooden Box (Michaels)

Friday, May 6, 2011

Crepe Paper Goodness!

Hi there! I finally got my camera in working order! Here we go! The crepe paper I used HERE for this creation is from the Melissa Frances Crepe Paper Collection found at The Stamp Simply RIBBON Store! Each package has four colors and comes in 9.8" x 49.2" sheets. I pulled the same colors I started with before and cut the width I needed off one end. The pink is approximately 1 inch and the green 1/2 inch.
To obtain the ruffles on the edge is very simple. I placed the edge lightly between my thumb and index finger and ran my nail along the edge. It stretches the edging causing the paper to ruffle!
And here is what you get with ruffling both sides of the paper strip! By just ruffling the edges, the center does not stretch as much and stays more compact than the edges creating what you see above!
For the green tails on the flower I simply stretched and wrapped around a pencil to get the crepe paper strip to somewhat curl.
Taking two 1/2" strips and pinching the ends with a slight twist allowed me to secure the flower middle to the center of my Gluber! What is a Gluber, you ask? Simply clear adhesive dots, uber sticky on both sides! I found my Glubers at The Stamp Simply RIBBON Store! They come in three sizes, of course you could cut them to any size you might need!
Twist the two strands of Crepe paper pressing onto the Gluber in a spiral. I would press a couple twists one way then switch it the opposite way so I had the pink side showing at times and the green side showing as well.
After attaching the center and taking the first spiral just keep going around! Notice I did not perfectly line up the pink and green strips, I wanted the edge of both to get stuck on the Gluber!
Twist, press and go around until you have reached the Gluber outer edge. Cut tail leaving enough to press under the clear adhesive Gluber when you peel the backing off.
The underside, if you look closely you can see the Gluber and where the crepe paper is sticks to the adhesive.
I had a die cut laying out that I did not use and decided to stick the flower on it and make a card embellishment. What worked really well is the part of the adhesive Gluber extending off the top and bottom of the die cut will enable easy attachment to a creation.
Growing up we always used crepe paper twisted streamers, and placedd them right down the middle of our tables! The crepe paper streamer rolls out in stores now for the most part do not hold the twist that well anymore. But let me tell you, this is some sturdy crepe paper, just the kind I remember using! I simply lightly twisted the tails, touching a bit of glue where I wanted it to stay put.
On one edge of my die cut, I ran a piece of 1/8 inch scortape. Then I cut the pink ruffle down and attached so we have a ruffle extending off the die cut edge.
The larger bows and streamers on my project HERE are ruffled strips of crepe paper that are looped with the ends becoming tails. Laying the loops opposite one another and twisting in the middle creates a bow with tails hanging. I then tied it to secure with Burlap String as shown.
Here is a peek of the bow with loops fluffed and tails positioned below the loops. You could add more loops if desired, make larger loops if wanted, and leave tails longer. It's up to you! So there you have it! So much fun, quick with great results! Give it a try! I hope you do and enjoy the process!

Take great care this weekend and wishing all a Happy and Blessed Mother's Day!

A dead camera battery! Ugh...

Hi, a quick not to let you know I am finishing up the post about the crepe paper goodness! Of course my camera battery died and I only have one! It's in the charger, I'll be back soon! Thanks for hanging in there with me!

Thursday, May 5, 2011

A Winner!

Hello! A quick post to let you know the winner of The Stamp Simply RIBBON Store Grand Opening celebration has been posted over on Sharon's BLOG! CONGRATULATIONS, Sherry! Sharon is sharing a spectacular card too!

Tomorrow I will be posting the how I stretched and curled that crepe paper on my Easter Bunny chocolate gift and card HERE! Hope you will stop by! See you then! Take good care and hope your day is full of blessings!

Wednesday, May 4, 2011

Life is like a Butterfly...

Welcome to JustRite's kick off of May release sets! Be prepared to wowed by the incredible designer's creations starting today & week days through May 11, each day beginning at 9am central.

I chose to create a card today, but a different size than I normally work with! Why? It all started when I was cleaning and came across business size envelopes that I had purchased way back, don't even remember when! My card measures four by nine inches. I so love the idea and vision surrounding this card, but couldn't put my finger on why I didn't like it when finished. I think I know after staring at it for awhile. The tulip stem is too narrow and throws the balance way off. But of course I had it all assembled after the light bulb moment! When I run another piece of ricrac to make a wider stem, I think that will help!

BUTTERFLY GARDEN is our featured JustRite set today! It is a JustRite Original set containing 4 Designer Centers along with 4 interchangeable Borders. These stamps fits our 3-1/4” Stamper. Wait till you see all the creations made by our talented designers with this set! Let's start from the bottom and move on up! These suede leave were simply scrunched and machine stitched as I went across the panel's width. I then trimmed bottom to a straight edge. For the Tulip I cut three #2 dies from my Spellbinders Mega Large Oval set. And the stamens are two head pins dipped in glue and coarse glitter! Found my bead making supplies as well when cleaning! LOL! This is the envelope I was speaking about! I used the same butterfly punch and punched three on the back side of the envie! Then I taped a piece of the K&Co Spring Blossoms designer paper inside to have it peek through! I also lightly glued the edges of the butterflies so they would not get caught and rip. Check out JustRite's MAY sale! 20% off Nested Frames and Sentiments and the Clear Horizontal Stamper Set, until May 31. Thanks so much stopping by today! Hope the sun is shining where you are! Here is the list of oh so talented designers sharing today!

JustRite Inspiration Blog

Mona Pendleton***

Sharon Harnist

Debbie Olson

Michele Kovack

Kathy Jones

Stephanie Kraft

Angela Barkhouse

Barb Schram

***We welcome Mona to the JustRite Design Team! She is an extremely talented designer and look forward to her designs using JustRite Stamps! Welcome Mona!

STAMPS: Butterfly Garden (JustRite) PAPER: White Cardstock (PapertreyInk), Rose (SU) INK: StazOn Black, TimHoltz Tattered Rose Distress DIES & PUNCHES: Large Mega Ovals #2 (Spellbinders), Martha Stewart Butterfly Punch (Michaels) OTHER: RicRac, Suede leaves, & Adhesive Pearls (The Stamp Simply RIBBON Store), Sewing Machine, Martha Stewart Coarse Glitter, Jewelry Head Pins,

Sunday, May 1, 2011

Crafty Secrets Postcard Album #2 and answers to questions!

You saw this front page peek yesterday! Today I bring you the rest of the album! Some of you have had questions about the album that I will answer at the end of this post! Thank you for your interest! The Hello heart placed on the basket is one of the smaller images adhered to a small chipboard piece with edges sanded. I added another clear fragment and pink adhesive gem!
The back to page one is set up for a photo or maybe a handwritten message! Again I used a dauber and ink to give the chipboard some color!
Page 2! Another beautiful image! Prima Rose Leaves with silk ribbon bow adorned with a Prim Fairytale Rose works well together! I had an "Easter Blessings" sentiment still on my desk from previous work, so I cut the ending off and glued it in between the rose and ribbon!
The back of page two is set up again for a photo most likely! A green oval could be used for a date or name maybe? And take a look at this darling bird nest stamp in the kit's stamp set.
Third page with some wrinkle ribbon! Another blank oval for some writing! Kind of looks like the ribbon is holding the bouquet together! Back of the third page reveals more stamping, with some red dots! Wrinkle ribbon and one of the smaller chipboard embellishments makes it complete! Notice this album is vertical and album one was horizontal. There you have it! I LOVE how these turned out and will be gifting them to my daughters for Mother's Day so they in turn can use them for their own daughters!
Thanks so much for stopping by! I appreciate it! Remember to get in on the BLOG CANDY from The Stamp Simply RIBBON Store hop!
All the info is HERE! Scroll down to end of post.
ANSWERS! If you have any other questions please contact me at bjshome@sbcglobal.net and I will respond!
  • The Crafty Secrets Postcard Best Buds Kit can be used to create Mail postcards, wall hangings, garlands, ornaments, etc. The possibilities are endless, I just chose to create TWO mini albums from one PostCard Kit! Very economical at $12.95 for entire kit!
  • The stamps in the set are tiny. But there are 11 stamps in the set, yes 11 clear stamps that can be utilized over and over.
  • I used four kinds of adhesives, Aleene's Tacky Glue, Tombow Mono Multi Liquid glue for tiny gems as it has a pen tip applicator, Foam dimensionals, and ScorTape. The holes are already punched in the large chipboard postcards, I added my own rings purchased at the dollar store! The ring measures 1 1/4" from outside edge to outside edge.
  • The Ringlet Trim is adhered using 1/8" Scortape. This is not a separate top trim and another piece of trim for the back. It is one piece! The wonderful thing about this ringlet trim is that it's very flexible and allows you to wrap the chipboard edge placing one side of the ringlet edge on the top and the other side on the bottom on the underside giving it such a finished look! This trim comes in five colors!